Cabinet refinishing is ideal for homeowners who are content with the design and functionality of their cabinets but would like to give them a fresh new look. It involves careful painting with a brush or sprayer, sanding between coats, and more.
It’s important to note that refinishing only works on wooden doors and cabinets. It’s not recommended for refinishing medium-density fiberboard or high-density fibreboard (MDF) doors and boxes, as stain doesn’t adhere to them well. Connect with Cabinet Refinishing Sacramento for reliable help.
Staining is a great option if you love the design of your cabinets and want to add a pop of color or hide minor wear and tear without the cost and hassle of a complete renovation. It also works best if you’re happy with the natural tone of your cabinet wood and just want to enhance its beauty.
Before you stain your cabinet doors, thoroughly clean them to remove any grease or grime. You can use a commercial cleaner like trisodium phosphate (TSP), or simply wash the surface with warm water and a sponge. Then, dry the cabinet surfaces with a cloth or paper towel.
Once your cabinet doors are completely dry, you’re ready to begin the staining process. Thoroughly read the product instructions, and apply one to two coats of stain, depending on your desired color and how much natural grain you want to show through. Be sure to allow enough time for the stain to dry in between each application.
There are several different types of stains to choose from, including oil-based and water-based. Oil-based stains are popular for their rich color and ability to highlight the natural wood grain. Water-based stains, on the other hand, are eco-friendly and low in odor. They are also easier to work with and require less specialized equipment. Another way to stain is by spraying, which can provide an even and consistent application.
When applying the stain, use a wide brush to cover large areas and a narrow brush for beveled or textured areas. Be sure to follow the wood grain when brushing. Let the first coat of stain dry for two to four hours before applying a second coat. When the stain is completely dry, lightly scuff the surface with fine-grit sandpaper to smooth and seal it. If you’re using a water-based stain, consider adding a layer of polyurethane for added protection against scratches, dust, and other environmental hazards.
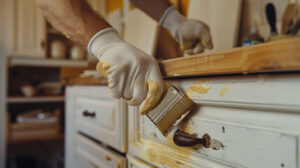
Painting
Painting is a great way to add some style to old cabinets that are still in good shape. It’s also an inexpensive option that can save you the expense of a full kitchen remodel. While refinishing involves sanding down and staining the wood, repainting simply covers up any blemishes or imperfections in your cabinet doors and drawer fronts. Whether you choose to paint or refinish, it’s important to thoroughly clean all surfaces before starting. This helps ensure that the new coat of paint adheres to the surface. It’s also important to use a high-quality paint, which will protect your surfaces from future damage.
The first step is to sand all cabinet surfaces to give the primer something to adhere to. Once you’ve sanded everything, clean it with a rag and vacuum the area to remove any lingering dust. You should also sand with a foam sander between coats of primer to smooth any ridges and give the paint a uniform finish.
It’s also important to make sure you’re using the right type of paint for your cabinets. If your cabinets are made of wood, you’ll need to use oil-based paint that can withstand repeated cleanings. If they’re made of laminate or metal, then water-based latex would be appropriate. You should also use a high-quality brush for the tight spots and corners.
Once your primer has dried, you can begin painting your cabinets. It’s a good idea to do the boxes first, then move on to the doors and drawer fronts. Depending on the paint you’re using, it may be necessary to apply three or more coats for a full coverage. Remember to follow the manufacturer’s instructions for drying times.
It’s also a good idea to use a paint sprayer on the larger surfaces and a soft-bristled brush on the edges and tight spaces. This will help you achieve a professional look and get the best results. It’s also a good idea to let the paint dry between coats, which is usually about 24 hours. Finally, be sure to work in a well-ventilated area and wear a respirator mask if you’re working with an oil-based paint.
Rigid Thermofoil
Thermofoil, or Rigid Thermofoil (RTF), cabinet doors and drawer fronts are a popular choice for homeowners who want a modern, sleek appearance that resists staining. A process known as vacuum pressuring and heat shrinking allows for the application of a white, colored or faux wood grain vinyl coating to an inexpensive medium-density fiberboard (MDF) substrate. The result is a highly durable surface that can mimic the look of more expensive materials.
The smooth surfaces of thermofoil cabinets and drawer faces wipe clean with a damp cloth. However, if they’re exposed to a lot of water—steam or frequent splashes—the moisture can seep in and weaken the vinyl adhesive bond, eventually leading to peeling. Scratches, bumps and other damage also weaken the edges, exposing the MDF core and opening the door to moisture and the eventual potential for delamination.
In general, thermofoil cabinet facings are less costly than painting because a machine handles the vacuum pressing and heat shrinking work, while painting requires multiple coats of primer, base, paint and top coats, as well as significant amounts of by-hand sanding labour. Thermofoil prices don’t fluctuate as much as the price of different types of paint, either, so you can easily switch between matte or satin white to a sleek black and still have a similar looking finish.
Thermofoil is a great option if your home has a limited budget or you prefer a low maintenance, easy-to-clean surface that’s resistant to humidity. However, if you love the natural beauty of wood and are willing to invest in its long-term care, it may be better to choose custom painted or stained wood cabinets.
If you have Thermofoil cabinet doors that are beginning to show signs of wear, a quick fix might be to scrape away the loose surface layers with a knife and apply contact cement in a well-ventilated area. But, it’s best to hire a refacing specialist for the job, as this isn’t an ideal DIY project and it’s important to use the right materials and techniques for lasting results. If the damaged surface is too far gone, replacement doors and drawer fronts are a more cost-effective alternative to refacing.
Hardware
The term “refacing” is often used interchangeably with “refinishing,” but to cabinet makers and professional remodelers, the two projects are quite different. Refacing is a complete cabinet renovation that removes the doors, and replaces or covers the boxes with new material such as wood veneer or laminate. Refinishing, on the other hand, keeps the existing components of cabinets and simply refreshes their color by resanding and painting.
Both refacing and refinishing are great options for those looking to give their kitchen a facelift without spending the time, money, or energy on a total remodel. Refinishing is a quick and affordable option for those who want to revitalize their cabinets, but it is not a good choice for those with damaged or dingy doors or cabinet boxes.
The refinishing process starts with a thorough cleaning of the cabinet surfaces, including a degreaser to remove any grease or oils that have built up over time. Careful sanding with medium and fine-grit paper is then performed, and the cabinet surfaces are prepped for painting. A coat of primer is then applied, followed by a coat of paint in your desired color. After the coats of paint are dry, they are sanded again, and the doors and drawers are ready for reinstall.
Before starting the actual refinishing project, it is important to label all of the cabinet door fronts and casings with a marker, or piece of tape to ensure that they are painted in the correct places. This helps prevent confusion, as cabinet doors can vary in size by as much as 1/4 inch. Also, it is a good idea to mark the door hinges, knobs, and pulls with a marker, so that they are easy to find when you are ready to reinstall them.
It is also a good idea to choose hardware that will coordinate with the new finish. There are many different choices for door knobs and pulls, ranging from traditional to modern styles. Many homeowners also like to vary the hardware finishes – such as brushed nickel, polished brass, oil-rubbed bronze, etc. – to add visual interest and contrast to the cabinets.